
It is impossible to imagine a modern kitchen without a kitchen base cabinet for utensils. It can be either part of a fashionable headset or an independent piece of furniture. In a properly selected cabinet, the utilitarian function is closely connected with the aesthetic one. However, first things first.
Freestanding cupboard: is it needed
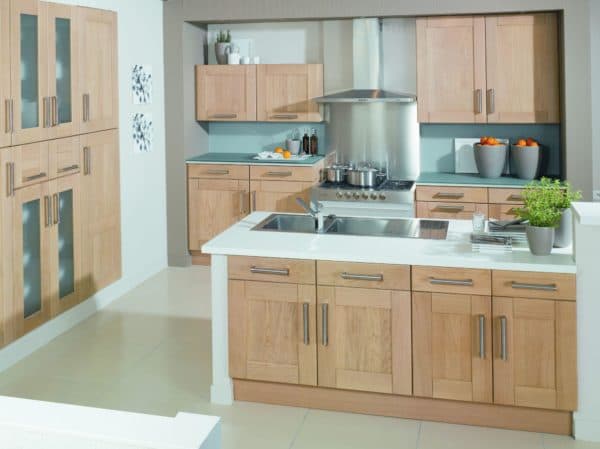
The need to place in the kitchen not only dishes and cutlery, but also modern household appliances makes this question pointless. Especially if the area of the room does not exceed 4-5m 2 . At the same time, the most popular here are floor cabinets – excellent furniture for Khrushchev. In addition, you can choose the filling of the cabinets.
Their advantages are visible to the naked eye:
- greater depth and spaciousness in comparison with a hinged shelf;
- lower cost than a fashionable headset;
- the ability to function as an independent piece of furniture. By the way, from several floor cabinets covered with a solid table top, you can make an interesting composition;
- strength and beauty. Typically, the case material is laminated chipboard, durable, resistant to static loads and mechanical damage. Its upper laminated layer perfectly imitates a wooden surface or is “painted” in almost any color. An additional attractiveness is given to the cabinet by its front surface – drawers or doors.

The cupboard also serves as a decorative function.
This piece of furniture has no drawbacks as such. All related problems are due to:
- the wrong choice of its dimensions or design,
- improper surface care,
- some features of the material of the frontal surface. So, laminated chipboard is sensitive to moisture, natural wood requires special protective impregnations and pastes, the smallest dirt and scratches are visible on the glossy plastic surface.
Dimensions: standard, high
When choosing a sideboard, first of all pay attention to its height, depth and width. The first indicator is the most important here. Its standard value, calculated for a hostess with a height of 158-165 cm, ranges from 82 cm to 85 cm.This includes:
- the height of the base (or legs) – about 10-15cm;
- cabinet box height – 70 cm;
- the thickness of the countertop is 2.8-4 cm.
If desired, the size of the first indicator can be increased to 90 cm due to the legs and the thickness of the table top. If the selected cabinet is intended to play a camouflage role, it is necessary to take into account the height of the household appliances built into it. Usually it is 82 cm.
The width of the base cabinet for dishes is most often 40 cm, 50 cm or 80 cm.However, if it is higher than 50 cm, it is necessary to choose a model with two hinged doors: one is inconvenient in this case.
The depth size varies from 40 cm to 55 cm. In this case, the tabletop should protrude beyond the front surface by about 1-3 cm. A drip tray is usually installed at the bottom of the latter, which does not allow spilled water to penetrate inside.
If the height of the hostess is above or below average, it becomes necessary to make a custom-made cupboard. The formula for calculating the height in this case is simple: the arm of a standing woman is bent at the elbow at a right angle. The optimal distance between the palm and the future tabletop varies from 10 cm to 15 cm.
When calculating the dimensions, it is necessary to take into account the location of communications and electrical wiring, as well as the individual characteristics of the kitchen: possible protrusions, depressions, locations of sockets, hoods,.

For a short girl, floor cabinets are just a godsend
The internal structure of the cabinet directly depends on the functions it performs. There are three options here:
- The cabinet is closed from the outside with one or two hinged doors. A horizontal shelf is installed inside, dividing its internal volume in half. The latter in some models can be removed, which makes storage of dishes even more convenient, unless, of course, the hostess obstructs a small object with a large saucepan.
- The cabinet is equipped with drawers. Their number ranges from two to four, but it is better when there are three of them. The contents of the drawers are immediately visible, but there is less storage space for dishes.
- The cabinet design combines the two previous options. At the same time, the drawer is designed for storing small things, and more bulky things are “hidden” behind the doors.
In modern furniture stores, a potential buyer can easily choose any model. If he is a lover of non-standard solutions, he can assemble the cabinet on his own.
How to do it yourself, size: height, depth
- To develop a project for the headset of the future cabinet, focusing on ready-made drawings in manuals, books or the Internet. Carefully measure all parts, indicate them in millimeters.
- if the future cabinet will stand between others, make sure that the doors open freely (and reduce their size by 4-5 mm): a smaller width is better than the need for further redoing;
- drawing parallel surfaces is not necessary here, but if different materials are used on them, you will have to take into account the difference in thickness and take measurements again;
- the thickness of the panels is also taken into account when joining, the assembly method, the size and number of shelves, the fastening features and the type of fittings used are thought out;
- the sides of the base cabinet can function as legs. In this case, the installation of the lower surface is carried out slightly above the level of the sidewalls, preferably by 5-6 cm in order to exclude the ingress of water on it;
- the empty space in this case is closed with a plinth. The thickness of the back wall is determined: it determines how much the cabinet will protrude forward.

Prepare the material and cut the parts. It is best to use chipboard or MDF boards for the cabinet and plywood for the shelves, back wall and bottom.
Carpentry trims are also a good option – essentially natural wood, but at half the price.
It is better to saw the material in the carpentry workshop for a certain fee: on a special machine they will make perfect cutting, prepare holes, and process the edges.
Stock up on tools:
- a milling cutter with a passable cutter and a nozzle for sampling self-tapping screws with a countersunk head (sweeping),
- screwdriver;
- a drill with a round nozzle or a knot drill;
- an ordinary drill and screwdriver;
- stapler with staples for fixing the back wall;
- universal level.
And also fittings:
- hidden door hinges;
- pins;
- dowels (round-section plug-in thorns);
- conformatami (Eurosurupami);
- plugs;
- screws;
- shelf supports or planks and glue.
- Proceed directly to the build process:
Drawing of a frame cabinet. Click to enlarge
The cut and numbered parts are stacked in the order in which they will be assembled. You should start with the roof, bottom, side walls and fastening strips for sliding shelves. With a pencil on the inner surface, it is noted which surface is mounted with what. Holes are drilled for the shelf supports. Immediately you need to designate a place for lamps for cabinets.
Holes are drilled on the door and one inner surface for hinged hinges, preferably with a round mill. However, a beginner can attach the doors to a piano hinge; The cabinet is assembled on dowel joints. The grooves are cut with a flat cutter, and the dowels are glued into them. Swollen from glue, they provide a strong connection, but are invisible from the outside. For greater strength, the dowels are additionally hammered. Next, they must enter the same hole made in the perpendicular plane.
The gaps between the dowels are carefully glued. Additionally, the main frame is fixed with confirmations (in extreme cases – nails) and closed with a plug. Perhaps you will find your suitable version of the kitchen base cabinet among the Ikea furniture catalog.
When assembling the body, do not forget about the plinth. It is inserted between the side walls and secured with pins.

By making the cabinet yourself, you can vary its size and configuration.
The back wall is attached to the base of the cabinet, previously checked for perpendicularity of the corners, using a stapler. If the design implies backlighting, holes for LEDs are prepared;
The cabinet door is attached. The holes for its fastening are drilled using a round mill or a knotting tool on the door. After installing each hinge, its horizontal position is verified. Only then is it fixed on the side wall and transferred to the second;
At the final stage, the shelves for the dishes are being installed.
The long life of the cabinet is ensured not only by the strength of its assembly, but also by proper care.
Care of kitchen cabinets
Cabinet care is subject to general recommendations:
- wiping the surface with a damp cloth (preferably flannel, cloth, plush or calico);
- the use of neutral water-soluble detergents (in a ratio of 98% water, 2% of the agent), and in the most difficult cases – special cleaners in strict accordance with the instructions attached to them. Refusal of funds. Containing abrasive materials and aggressive liquids (oils, acids, alkalis) or their vapors;
- cleaning the surface immediately after it is dirty and then wiping it dry. In general, the surface of the cabinet should, if possible, be protected from water accumulation on it. This is especially true for countertops;
If you have to deal with a wooden front surface, wipe it in the direction of the wood pattern, thereby removing dirt from its pores. Steam cleaning is not suitable here, but dry cleaning can be done using a vacuum cleaner with a soft brush attachment.
Glass and ceramic surfaces are cleaned only with special detergents for glass and ceramics. And if necessary, to degrease the contamination, use an aqueous solution of denatured alcohol.
It is equally important to properly fill the cupboard during ego operation. The load here should be evenly distributed over the entire area, therefore, it is preferable to put heavier objects closer to the edges for support, lighter ones closer to the center.
If the top of the base cabinet replaces an oak worktop, care must be taken as if it were a natural material.
The permissible load on the shelves should not exceed 10 kg. And so that doors and drawers do not warp, they should be kept closed at all times.
The kitchen cupboard needs constant maintenance. Only in this case will it last long enough.
During operation, the cabinet fittings wear out. Doors creak and open with difficulty, drawers do not slide out well. Cope with this problem in a timely manner by adjusting the hinges or with mazyvaya guide rail paraffin or similar by means of the properties. If the nodes of the threaded connections are weakened, they are periodically tightened. For more serious seizures, rub the rubbing surfaces with sandpaper.
The appearance of an old kitchen cabinet, which retains its former strength, can also be restored using decoupage or single-phase craquelure methods.
Restoration of cabinets, individual tables, countertops
This procedure takes place in two stages:
- Strength test and, if necessary, repair.
- replacement of worn out connections and fasteners;
- at the same time, the screws are screwed in in other places, if possible, and the old holes are putty;
- new nails for reliability are fixed with dowels and wood glue;
- the surface of the cabinet is cleaned of handles and other decorative elements, washed, freed from the old coating using sandpaper of varying grain size) and primed;
- after the primer has dried, cracks and grooves are putty, scratches are masked using a special furniture wax, better than colorless;
- the places where the bug is eaten are covered with a special antiseptic composition;
- after the putty wax is dry, the surface is sanded again and then primed.
Decorating a kitchen rack, cabinet, pencil case, drawer
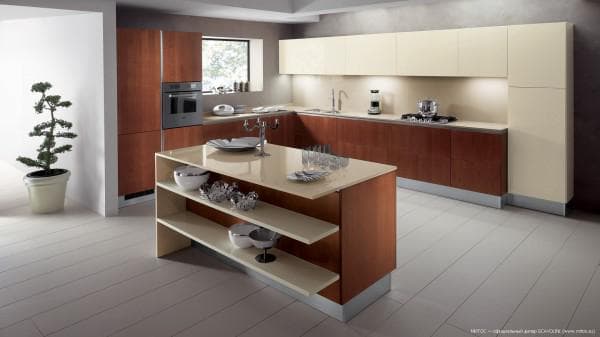
And you can make such cabinets with open shelves
Most often used here:
- Decoupage – pictures cut from napkins are superimposed on the newly painted dried surface. Their contours are marked. And the pictures themselves are immersed in a bowl of water for 30-60 seconds. Then they are laid out on a transparent plastic bag. Meanwhile, the place for gluing is smeared with PVA glue. Pictures are superimposed on it and carefully aligned. The glued pictures are allowed to dry and covered with colorless varnish on top;
- Single-phase craquelure – application of a special varnish, artificially “aging” the furniture to give it an antique look. The surface is covered with a uniform, uniform layer of matt acrylic paint. It is better if it is darker than the varnish, since its color will show through the craquelure cracks. After its complete drying, a layer of craquelure varnish is applied, which is thoroughly shaken before work. It doesn’t have to be very subtle to get the desired effect. The completely dried coating is evenly covered with a colorless varnish.
A wardrobe, a curbstone, a pencil case, a table or a separate rack for dishes is convenient and comfortable. Such a cabinet not only performs its direct functions of storing dishes, but also a decorative function. But it is not at all necessary to purchase it, you can do it yourself. In our other articles, you can familiarize yourself with the drawing of a corner kitchen.