
Furniture that no longer has a decent look, but it’s a pity to throw it away, because it still performs its main functions, is present in almost every home and most often these are stools. You can correct the situation and give stools a second life with the help of decoupage. Of course, all work will require financial costs and effort, but in the end, a thing created by oneself will appear in the house, which will delight with its exclusivity. What is decoupage and how can you update furniture with it?
Decoupage what is it
Decoupage is far from a new direction in the restoration and decoration of various objects, but it was used mainly by the poor, who simply had nothing to buy new furniture for. In the modern world, decoupage is considered one of the trends in art, with which various objects are decorated and is an interesting idea for the kitchen.
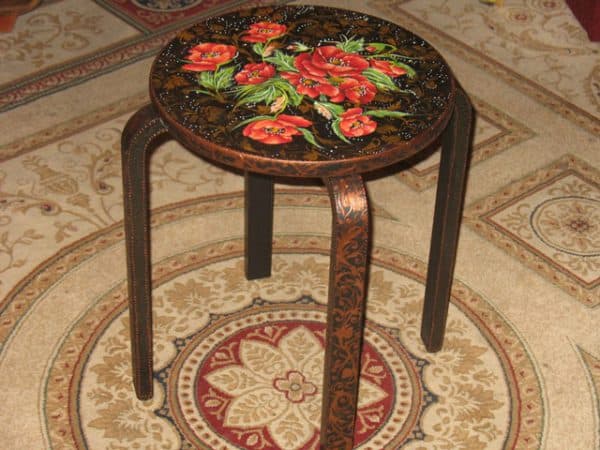
Processed stool
All decoupage work is based on cutting out small parts from various fabrics, cardboard and paper, which are subsequently glued to the base. Next, the resulting composition is painted and varnished in several layers. This procedure allows you to fix the glued part to the surface to the maximum and hide the joints as much as possible. The updated thing can be decorated with gilding or other effects, at the discretion of the owner. The whole decoupage procedure allows you to update or simply decorate an arbitrary object, whether it is the restoration of a stool or the decoration of radiators.
All the necessary materials for work can be purchased in specialized stores or you can order from special sites where goods are provided to fulfill any fantasy. Sketches for blending are taken from magazines, wrapping paper, fabrics or also from the Internet. In the same way, you can carry out the restoration of kitchen facades.
In this way, you can decorate a wide variety of surfaces: glass, porcelain, fabric, wood. This allows you to update furniture, add an intricate pattern to mirrors or dishes.
Stool restoration
I would like to note the rhinestone – decoupage of an old stool is not a difficult process, but it requires patience. After each process of applying paints, varnishes or primers, it is imperative to wait for the allotted time for them to dry, otherwise the look of the stool will not become better than it was.
Required for work
Before you start, you need to make sure that the following materials are at hand and at any stage of work, you do not have to drop everything and run to the shops:
- primer (for wood to level the surface);
- sandpaper (preferably coarse forty);
- paraffin candle;
- acrylic paints (white and brown are required, and for additional finishing you can take any desired color), if there is a shortage, you can use wall paints;
- fan brushes (flat) to create decoupage;
- special stickers or napkins;
- PVA glue;
- sponge (can be used for washing dishes);
- acrylic lacquer;
- to finish the stool along the edge, you can buy guipure;
- guipure is glued with a glue gun. And about cheap kitchen corners can be found at the link.
Do not rush to quickly purchase stickers. Go shopping and take a look. In stationery departments, such stickers can be found 3-4 times cheaper than in specialized stores.
Training
Before you start updating the old stool, it needs to be completely disassembled.

Dismantling the stool
Further, the remains of varnish are removed from all surfaces, which have not yet been erased during operation. The procedure is carried out with sandpaper, not forgetting the legs.
Since many stools are made of pressed material, the surface is likely to be rough. You shouldn’t get upset. To remedy the situation, wood primer was purchased. It is applied in 1 – 3 layers, depending on the result.
Each layer must be dried, on average 3 hours. Do not forget about the primer ends. In the future, this will help to avoid moisture ingress, and the work will not deteriorate.
For a better result, some craftsmen add a little acrylic paint (white) and PVA glue to the primer, and after each layer, lightly sand the details. And about the kitchen glass sliding table can be found here.
In cases with perfectly flat surfaces, the cleaning and priming process is skipped.
Process
Further, as all surfaces are prepared and dried, you can proceed to the main work:
- At the first stage, the entire surface is covered with white acrylic. Along the edge, and in small areas in the center, brown acrylic is applied.
- After the paint has dried (about 3 hours), the places with a dark color are rubbed with a candle.
- The entire surface is again treated in two layers with white acrylic and left to dry (for a day).
- A day later, the surface is lightly rubbed with sandpaper so that dark acrylic begins to show through the white layer. You can not overdo it and remove all the applied layers. It is required to create the effect of a slightly worn thing.
- The base is ready and you can proceed to the design itself. A conceived compositional drawing is assembled from napkins. Fragments taken from napkins should be cut off at the edges rather than cut out. This method will make the edge borders less noticeable.
- The whole composition is folded, and you can start gluing it. Here we need a brush and PVA glue. It is better to dilute the glue slightly so that it is not too thick and does not reach for the brush. Each fragment is carefully processed with glue and applied to the surface, while all the irregularities are smoothed out, and the wrapped edges are straightened. Also, you will need to carefully remove the air, if suddenly it got under the fragment.
- The whole composition is assembled and ready. To complete it, along the edges of the stool, you can create a color accent using a sponge and a pre-selected color. The lip is dipped in acrylic and the entire edge is soaked with light movements.
- All the stages of work passed are repeated for the legs.
- After everything has dried well, all surfaces are covered with acrylic varnish. It is advisable to repeat the procedure in 2 – 3 layers while waiting for the preliminary drying.
- The stool is assembled, and its edge is decorated with guipure, which is more convenient to fix with a glue gun.
Other ways to update furniture
In addition to the decoupage technique, the stool can be restored in other equally interesting ways:
- Soft upholstery changes on the surface of the stool. By the way, it can be created even if the stool did not have a soft seat before. The legs are processed, as in the work with decoupage (they are cleaned, painted and varnished). On the lid itself, a square is cut out of foam rubber and fabric 10 cm larger than the size of the lid itself. On the reverse side, the fabric is attached to the base, using a stapler or small nails.
- You can sew on a stool a regular cover with thick fabric. By the way, this method is also good because the cover can be removed at any time to stretch. But using this method, the stool will still need to be restored by staining.
- And the easiest way is to repaint the stool. All work will be carried out in the same order as with decoupage. The difference is that you do not need to apply a pattern. And about a folding stool for the kitchen can be found in this article.
As you can see, there are enough ways to restore an old stool, and the thing can last for a long time. But can at least one of them compare with the art of decoupage, thanks to which you can create a truly unique thing? We also recommend that you familiarize yourself with the wooden facades for the pine kitchen in this material.